


The advice provided on cryptocurrency and/or bitcoin trading is for informational and educational purposes only and does not constitute financial advice or investment recommendations. The cryptocurrency market, including bitcoin, is highly volatile and poses significant risks. Any investment decision or transaction made based on the provided information is the sole responsibility of the user. We strongly recommend conducting thorough research, consulting professional financial advisors, and considering your own financial situation and risk tolerance before engaging in any cryptocurrency and/or bitcoin-related activities. We are not responsible for any loss or damage resulting from the misuse of the provided information.
In this article we will explain, step by step, how to withdraw USDT from your Material USDT wallet in a simple manner. In addition, in this tutorial, you will also learn how to send your Tether (usdt) funds to your Material USDT or to another public address.
Remember that you can do this from any of your devices.
How to remove USDT from your Material USDT wallet
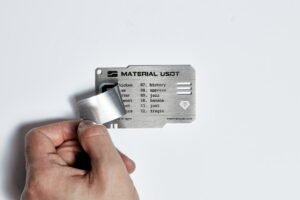
As you know, in your USDT Material, you have your seed phrase protected by a metallic vinyl. This key is necessary to move your Tether to another location, but be careful, it is extremely crucial that only you have access to it.
Remember: The fees to transfer USDT will be paid with Ether, so you need to keep some Ethereum in order to transfer USDT to other wallets or exchanges.
Step 1
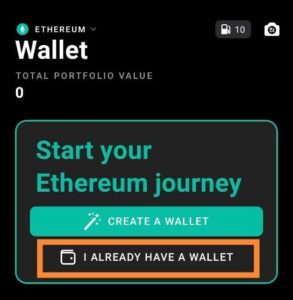
Well, the first thing you need to do is to access My Ether Wallet.
Once inside, you will see the option “I already have a wallet”, select it or click on it.
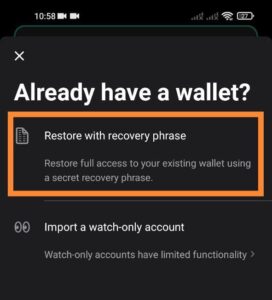
Then, among other options, you will see “Restore with recovery phrase”, select it or click on it.
Step 2
You will see this screen with different numbers. This is where you enter each of the words on the back of your wallet. It will also ask for a PIN and, if you want, your fingerprint.
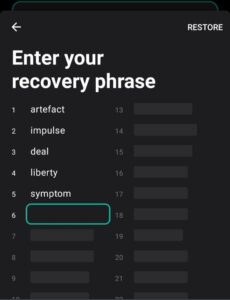
Add 12 words that you have in the reverse of the Material USDT wallet.
Step 3
Once you have completed the above steps, you have your wallet imported and ready to send your funds to an exchange.

*In the picture you can see that in this wallet we already had ETH balance to pay the fees*.
How to send your funds from your Material USDT wallet to another address?
Sending funds from your Material USDT wallet to another address is a process that you can do at any time from your cell phone or PC and will not take you more than 5 minutes
Steps to send USDT from your Material USDT wallet to another address
Step 1
Once you have imported the mnemonic seed of your Material USDT and created your wallet with your Tether, then select it. This is what we have already seen in the previous steps. When you do so, the cryptocurrencies you have deposited in that wallet will appear.
In this case, select Tether.
Step 2
Once you have selected it, you will see, among others, the Send option.
It will ask you for the public address of your wallet (or the address to which you want to send the USDTs).
Reminder: This address is NOT your seed phrase, it is your public address.It is the one we use to send our Tether or check our wallet balance.
Here you can enter the public address of your own wallet if you want to send the Tether back to it. On the other hand, if you want to send them to another location, you will need to enter the public address of that other location.
You can scan the QR of your Material USDT, paste it from another file or type it manually.
Step 3
Once you have entered the public address, you will be asked for the amount of USDT you want to send. You will also be informed of the commissions you will be charged and the time it will take to send your USDT.
Keep in mind that the fees will be subtracted from the amount you want to send, so you will not send the full amount you want.
Once you do this, you will click on Send and you will be asked to verify the transaction.
Step 4
You will have to make a double check confirming the transaction.
Confirm the address (Check the address) and the amount (Check the amount) and click on Confirm and send.
You will be asked to enter the PIN, remember that it is the one you set up when you first import the wallet into My Ether Wallet.
WARNING: Make sure that you have all your balance in your wallet and that you have no funds left in the app. If this is the case, you can now delete the wallet created upon successful transaction.
It is very important that you delete any trace of your mnemonic seed. To do this, you will need to delete the created wallet.
How to delete wallet from My Ether Wallet
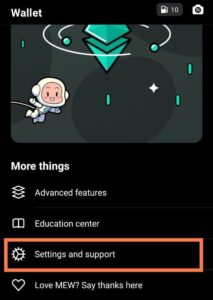
Click on Settings and support and then Settings.
Click on Settings.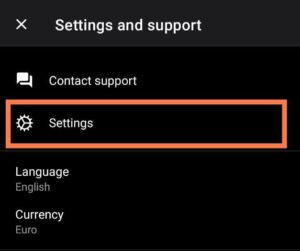
Then select Reset wallet and confirm. Your wallet is now deleted.

Note: Even if you have remaining balance in your Material USDT, as we only import the private key, we will not remove anything sensitive: Your wallet will still contain the remaining balance after the transaction, and it will be fully usable.
Do you need help? If you still have questions you can contact us here
If you purchased any of our wallets, we encourage you to join our Telegram channel to enjoy exclusive content and promotions.


0 Comments